OBD2
This post is about an alternative to taking your car into the repair shop when the check engine light comes on.
Six years ago, I bought an on-board diagnostic (OBD) interface tool (you'll find them for sale on Ebay, Amazon, etc. if you search for "elm327 obd2 to usb") that enables connecting a laptop to the on board computer of a car. Once connected, it's possible to read and clear trouble codes—and do many other things that are more complicated should you wish to do so. I recently used it again when my sister's car had the check engine light on, so I thought it would be a good topic to post about.
The interface tool plugs into a port that is somewhere on the driver's side footwell in most cars, I think:
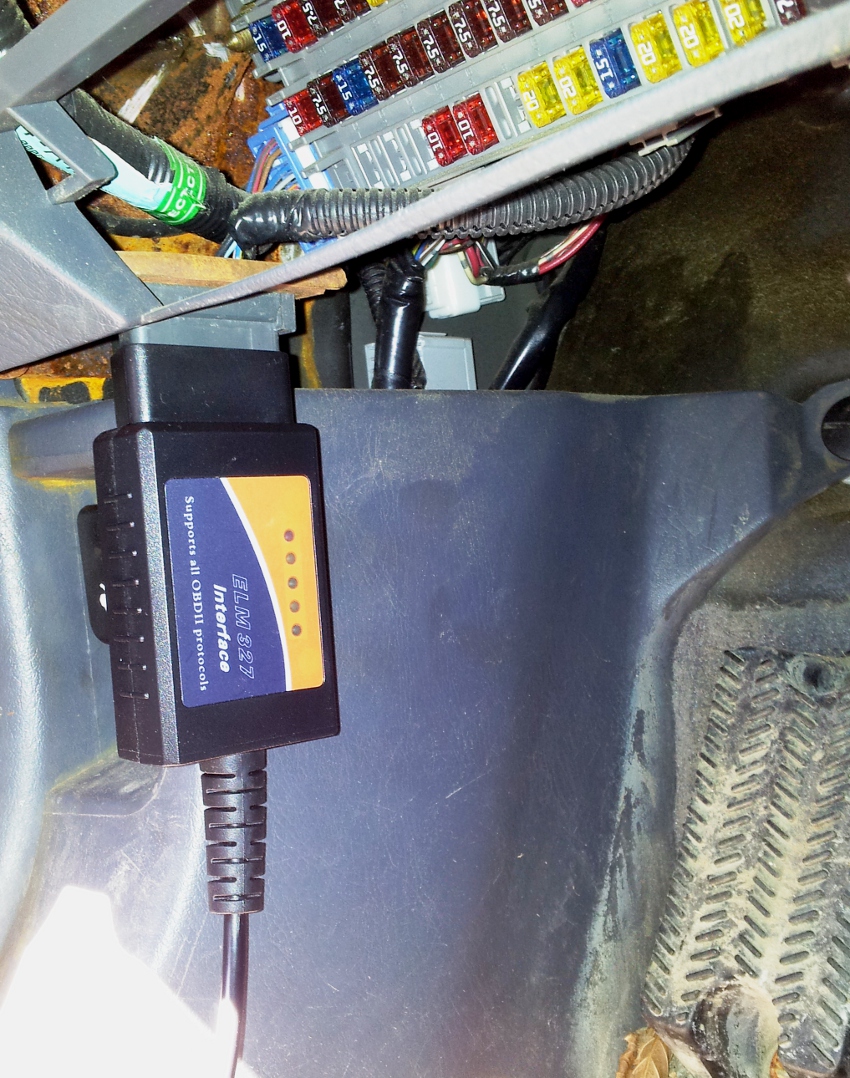
Once it's plugged in to the car (which should have the ignition turned to "ON"; I'm not sure if it actually needs to be running) and to my laptop, I communicate with it using a serial console session on Linux. This video has a tutorial on doing this. The command to launch the session is sudo screen /dev/ttyUSB0 38400, where 38400 is the baud rate.
Once in communication with the on-board computer (which can take patience as it can be kind of slow), there are numerous commands you can send; they are mainly in the form of one or two 2-digit hexadecimal numbers: a mode which may be followed by a PID.
Common commands include 01 01 to retrieve the number of active trouble codes, 03 to request the codes, and 04 to reset the check engine light. Here is a typical session, followed by interpretation:
>01 01
[4]1 01 83 07 65 00
>03
[4]3 04 41 04 42 04 46
>04
[4]4
I've shown this as separate lines, but in my session incoming data just keeps overwriting the first line. The numbers in square brackets thus get hidden by the prompt (>) character. The commands used follow what was mentioned in the previous paragraph. Each response begins by echoing the command entered, with 40* added. In the first response this echo is 41 01, for example. It is followed by 83, where apparently the 80* means the check engine light is on and the 3 indicates that there are 3 active trouble codes. I'm not sure of the meaning of the rest of that line. The second response, following the echo 43, shows what those trouble codes are: 04 41, 04 42, and 04 46. The third response, 44, simply acknowledges that the trouble codes have been cleared.
*These uses of 40 and 80 seem less arbitrary when you convert from hexadecimal to binary
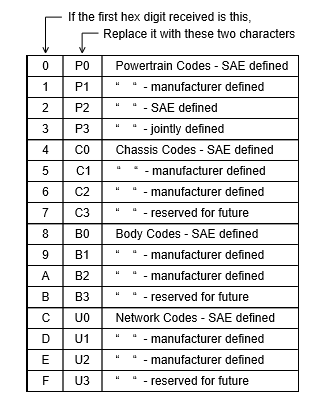
To interpret the trouble codes (e.g. 04 41, 04 42, and 04 46), consult the table below, then search online for the meaning of that code. For example, 04 42 becomes P0442, which is interpreted as "Evaporative Emission Control System Leak Detected (Small Leak)" according to this forum post. Once you know what the problem is, you can search how to fix it yourself, or call around to get competitive quotes from different repair shops.
The ELM327 manual has been my main reference for understanding the codes to send and receive. Here are some additional ones that it lists beyond what I've already used above:
AT RV= read battery voltage01 05= engine coolant temperature (convert hexadecimal to decimal and then subtract 40 for °C)01 0C= engine speed (convert hexadecimal to decimal and divide by 4 for RPM)01 01= how many trouble codes stored (it adds 80 to the answer)03= report trouble codes (4 digits each)04= clear trouble codes09 02= VIN (convert it to ASCII)
Mode 01 is a request to show current data and has many PIDs (e.g. 05 for engine coolant temperature) to clarify which data is sought; modes 03 and 04 can be called on their own (without a PID) because they don't need any clarification.
Wikipedia has a more comprehensive list of OBD2 modes and PIDs (you really need to know what you're doing to interpret most of these).
Another random vehicle tip that I'll finish this post with is that I used to have a lot of frustration from my car doors freezing shut in the winter. This winter I applied some synthetic grease (after checking that it was compatible with metal and rubber and wouldn't freeze) with a rag to the top inside edge of the doors (where they contact the weatherstripping). I haven't had problems with them freezing since then.